When most people hear “accessible bathroom,” they picture a sterile, hospital-like space with metal rails and white plastic surfaces. That image is outdated—and it’s wrong.
Modern accessible bathroom design is about creating spaces that are safe, comfortable, and beautiful for everyone who uses them, regardless of age or ability. It’s about thoughtful choices in layout, fixtures, and materials that make daily routines easier without sacrificing the design aesthetic you want for your home.
Whether you’re planning ahead for aging in place, accommodating a family member’s current mobility needs, or simply building a bathroom that’s smarter and more functional, accessible design delivers value that goes far beyond compliance with building codes.
What Is Universal Design and Why Does It Matter for Bathrooms?
Universal design is a philosophy that aims to create spaces usable by the widest range of people possible, without requiring adaptation or specialized design. In a bathroom context, this means features that work equally well for a 30-year-old, a 70-year-old, someone recovering from knee surgery, and a parent bathing a toddler.
The practical benefit is straightforward: a bathroom designed with universal principles doesn’t become obsolete as your needs change. Instead of facing a costly renovation when mobility changes, you’re already living in a space that adapts to your life.
For Rochester-area homeowners, this is particularly relevant. Monroe County’s population skews older than the national average, and many households are multigenerational—adult children caring for aging parents, or grandparents helping raise grandchildren. A universally designed bathroom serves everyone in the household without feeling like it was designed exclusively for one person’s limitations.
Zero-Threshold and Curbless Showers
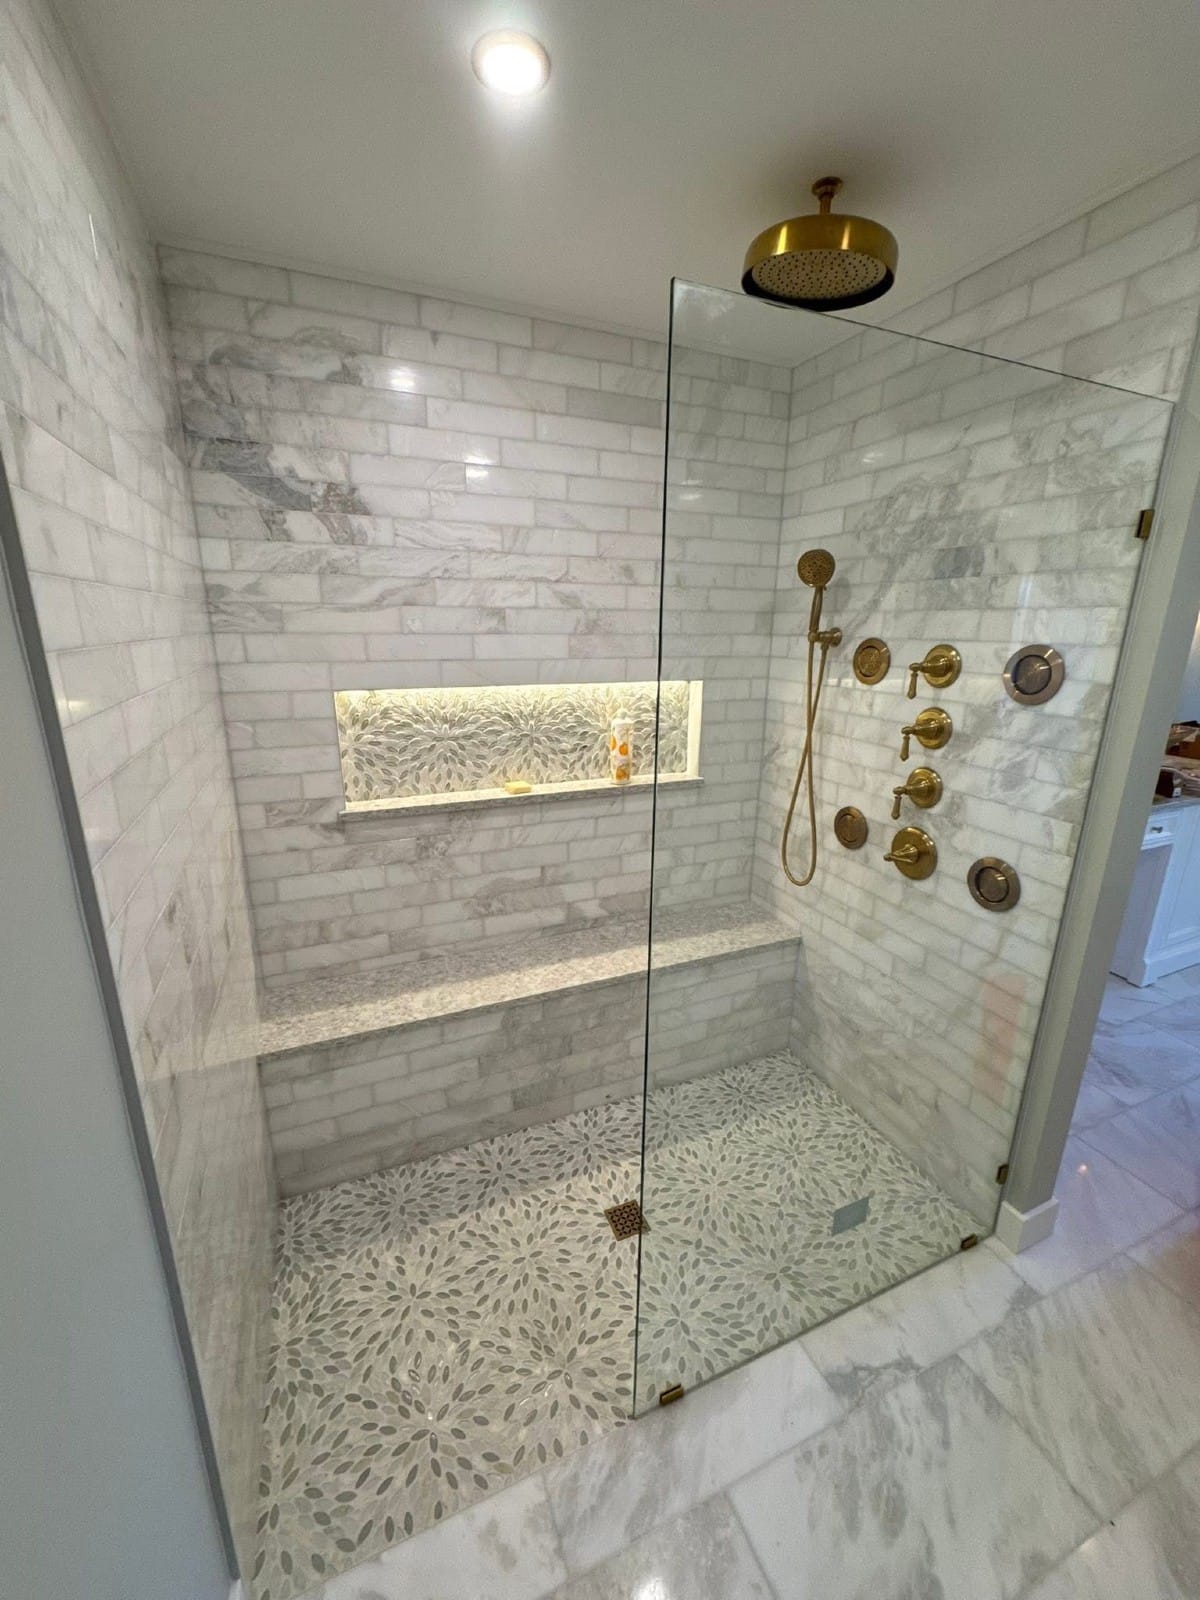
The curbless shower is arguably the single most impactful accessible design element you can add to a bathroom. By eliminating the step-over threshold, you remove the most common trip hazard in the space—while also creating a clean, contemporary look that’s become highly desirable in modern bathroom design.
How Curbless Showers Work
A curbless shower requires careful floor preparation. The shower area slopes gently toward the drain (typically at a 2% grade), and the surrounding bathroom floor either meets the shower floor flush or sits very slightly higher. This requires precise waterproofing—a bonded membrane system that covers the entire shower area and extends beyond the threshold line.
In older Rochester homes with wood-framed floors, installing a curbless shower may require modifying the subfloor structure to create the necessary slope. This is standard work for experienced remodeling contractors, but it’s one reason curbless showers cost more than traditional shower pans—the prep work is more involved.
Design Options That Don’t Feel “Accessible”
A curbless shower can be finished with the same tile, stone, or solid surface materials you’d use in any high-end bathroom. Linear drains positioned along one wall create a sleek look. Frameless glass panels or partial walls provide splash containment without creating a boxed-in feel. The result is a shower that looks like a deliberate design choice—because it is.
Grab Bars: Placement, Types, and Design Integration
Grab bars have come a long way from the institutional stainless steel bars bolted to tile walls. Today’s grab bars are available in every finish from matte black to brushed gold, in styles that blend seamlessly with towel bars, shower shelves, and other bathroom hardware.
Where to Install Grab Bars
Strategic placement matters more than quantity. The key locations are beside the toilet (both for sitting down and standing up), inside the shower at two heights—one horizontal bar at about 33–36 inches for balance while standing, and one vertical bar near the entry point for gripping while stepping in—and near the bathtub if you’re keeping one. A grab bar at the shower controls is also valuable, giving the user something to hold while reaching to adjust water temperature.
Behind-the-Wall Preparation
The critical detail most homeowners don’t think about: grab bars need solid backing in the wall to support body weight. Standard drywall and studs at 16-inch centers may not align with ideal grab bar locations. During a remodel, the best practice is to install solid wood blocking or plywood backing behind the finished wall surface at every potential grab bar location—even if you’re not installing bars right now.
This is one of the most cost-effective decisions you can make during a bathroom remodel. Adding blocking during construction costs almost nothing compared to the expense of opening up a finished wall later to add support. It’s future-proofing at its most practical.
Wider Doorways and Clear Floor Space
Standard bathroom doorways are typically 24–28 inches wide—fine for most people walking through, but too narrow for a wheelchair, walker, or even someone carrying a laundry basket. Widening the doorway to 32–36 inches makes a meaningful difference in usability without dramatically affecting the adjacent room.
If a full doorway widening isn’t feasible (some older homes have structural constraints), offset hinges can add 2 inches of clear width by swinging the door completely out of the frame opening. Pocket doors or barn-door sliders eliminate the door swing entirely, which is especially valuable in tight hallways.
Inside the bathroom, clear floor space matters as much as the doorway width. Aim for a 60-inch turning radius somewhere in the room—this accommodates wheelchair users but also just makes the bathroom feel more comfortable and less cramped for everyone.
Comfort-Height Toilets and Toilet Area Design
Standard toilets sit about 15 inches from the floor. Comfort-height toilets (sometimes called “right height” or “ADA height”) sit at 17–19 inches. That 2–4 inch difference dramatically reduces the effort required to sit down and stand up, making a noticeable difference for anyone with knee, hip, or back issues.
Comfort-height toilets are available in every style—one-piece, two-piece, wall-mounted—and at every price point. There’s no visual penalty for choosing this option. Most visitors to your bathroom will never notice the height difference; they’ll just find it more comfortable.
Consider the space beside the toilet as well. Keeping at least 18 inches of clearance on the side nearest the wall (or on both sides) provides room for grab bar installation and makes transferring from a wheelchair possible if ever needed.
Non-Slip Flooring That Actually Looks Good
Slip resistance is non-negotiable in an accessible bathroom, but it doesn’t mean you’re stuck with rubber matting or clinical-looking surfaces.
Porcelain and ceramic tiles are available with textured surfaces that provide excellent slip resistance while maintaining a polished, contemporary appearance. Look for tiles rated with a coefficient of friction (COF) of 0.60 or higher for wet areas. Smaller tiles—like mosaics or 2×2 formats—offer even more traction because the increased grout lines add grip.
Luxury vinyl tile (LVT) is another strong option for bathroom floors. It’s inherently slip-resistant, warm underfoot (unlike ceramic tile), and available in realistic stone and wood-look patterns. For homeowners on a budget, LVT delivers a high-end look with practical accessibility benefits.
Heated flooring is worth considering as well. Radiant heat under tile eliminates the cold-floor shock that causes people to rush through the bathroom—and rushing is when slips happen. It’s a comfort upgrade and a safety feature in one.
Accessible Vanity and Sink Design
An accessible vanity doesn’t have to look different from a standard one. The key adjustments are about clearance and reach. A wall-mounted vanity or one with open space beneath the sink bowl allows a seated user to pull up close. Lever-style faucet handles (rather than knobs) require less grip strength and are easier to operate with wet hands—a benefit for everyone.
Countertop height is another consideration. Standard vanity height is 30–32 inches; accessible installations may lower this to 34 inches (which is also the standard for kitchen counters, so it feels natural). For households with users of different heights or abilities, a split-height vanity—one section at standard height, one lower—provides flexibility without compromise.
Storage planning matters, too. Pull-out drawers are easier to access than deep cabinets. A tilted mirror or one that extends down closer to the counter helps seated users. These are small adjustments that add up to a bathroom that works for the widest range of people.
Lighting for Safety and Comfort
Good lighting is one of the most overlooked accessibility features in a bathroom. Aging eyes need more light—roughly three times more than a 20-year-old’s eyes for the same task—and uneven lighting creates shadows that obscure edges, steps, and potential hazards.
Layer your lighting: ambient overhead lighting for general illumination, task lighting at the vanity for grooming, and accent or night lighting for safe navigation in the dark. A motion-activated nightlight along the path from the bed to the bathroom prevents the dangerous combination of darkness and disorientation that leads to nighttime falls.
Rocker-style light switches (rather than toggle switches) are easier to operate with limited hand mobility, and they’re standard in most new construction today. Placing switches at 42–48 inches rather than the standard 48–52 inches makes them reachable from a seated position.
Accessible Design and Rochester Home Values
Rochester’s real estate market increasingly values accessible features. As the area’s population ages and multigenerational living becomes more common, homes with accessible bathrooms appeal to a wider pool of buyers. A first-floor bathroom with a curbless shower and grab bars isn’t just a personal convenience—it’s a selling point.
Many Rochester-area homes are two-story colonials or cape cods with all bathrooms on the second floor. Adding or Upgrading a first-floor half-bath to a full accessible bathroom is one of the highest-impact modifications for long-term livability. It’s also one of the projects that consistently returns its investment at resale.
The key insight is that accessible design, done well, doesn’t limit your buyer pool—it expands it. A beautifully finished curbless shower appeals to the 35-year-old couple who wants a modern spa bathroom and the 65-year-old couple planning to age in their home. That’s the power of universal design: it serves everyone.
Frequently Asked Questions
Q: How much does an accessible bathroom remodel cost?
A: An accessible bathroom remodel in the Rochester area typically falls within the mid-range to full renovation cost tiers, roughly $20,000 to $60,000 depending on scope. Key cost drivers include curbless shower installation (which requires subfloor modification in older homes), grab bar blocking and installation, wider doorways, comfort-height fixtures, and ADA-compliant clearances. Many of these features add modest incremental cost when included during a planned remodel rather than retrofitted later.
Q: Will an accessible bathroom design hurt my home’s resale value?
A: No. Modern accessible bathroom design uses the same high-quality materials and contemporary aesthetics as any upscale bathroom. Features like curbless showers, comfort-height toilets, and stylish grab bars are increasingly sought after by buyers of all ages. When executed well, an accessible bathroom looks like a deliberate design choice rather than a medical accommodation, and it appeals to a broader range of potential buyers.
Q: Can I make my bathroom more accessible without a full remodel?
A: Yes. Several impactful modifications can be made without a complete renovation. Installing grab bars at the toilet and in the shower, replacing a standard toilet with a comfort-height model, adding a handheld showerhead on an adjustable slide bar, and improving lighting are all changes that significantly improve safety and usability. If the walls were built with blocking behind the tile, grab bar installation is straightforward. Without blocking, a contractor can install bars that anchor into studs.
Q: What is the ADA clearance requirement for a residential bathroom?
A: ADA standards require a minimum 60-inch turning radius for wheelchair access, a 48-inch clear floor space in front of the toilet, and a 36-inch minimum clear doorway width. While residential bathrooms are not legally required to meet ADA standards unless they are in certain types of housing, using these dimensions as guidelines ensures the bathroom is genuinely usable for someone with mobility limitations, not just technically accessible.
Q: Are curbless showers difficult to keep clean?
A: Curbless showers are no more difficult to maintain than traditional showers, and many homeowners find them easier to clean because there is no curb or track collecting soap residue. The key is proper installation with adequate slope toward the drain and a quality waterproofing membrane. Linear drains, which are common in curbless designs, are straightforward to clean and maintain. Using large-format tile reduces grout lines, which further simplifies cleaning.
Q: Should I install grab bars even if no one in my household currently needs them?
A: Yes. Installing blocking behind the walls during a remodel costs very little but makes future grab bar installation simple and secure. Even if you install the bars now, modern grab bars are available in finishes and styles that complement any bathroom design. They are as much a safety feature as a smoke detector, providing stability for anyone who slips on a wet surface, recovers from surgery, or simply wants extra support stepping in and out of the shower.
Create an Accessible Bathroom That Reflects Your Style
Accessible bathroom design is about making your daily routine safer and more comfortable without sacrificing the look and feel you want for your home. At Maressa Remodeling, we approach every accessible bathroom project with the same commitment to craftsmanship, design quality, and attention to detail that we bring to every remodel.
Our team serves homeowners throughout the Greater Rochester area, and we understand the unique characteristics of the local housing stock—from the framing considerations in post-war homes to the plumbing realities of mid-century construction. Whether you’re proactively planning for the future or addressing a current need, we’ll work with you to design and build a bathroom that’s safe, beautiful, and built to last.
→ Schedule a consultation to discuss your accessible bathroom project
INTERNAL LINKING NOTES:
- Link “aging in place” references to /aging-in-place-remodeling-guide/ (pillar page)
- Link “bathroom remodel” or “bathroom renovation” to /interior-remodeling/bathrooms/
- Link “bathroom remodel cost” reference to /bathroom-remodel-cost-rochester-ny/ (companion post)
- Link “consultation” CTA to /contact-us/
- This post supports the Aging in Place pillar cluster — ensure the pillar page links back to this post
- Cross-link with /keep-life-rolling-remodeling-for-accessibility if it remains indexed